VISUAL EFFECTS -SEM 2
MY STORY IDEA
After learning about the brief to interview someone, I immediately thought of the perfect candidate. A friend of mine recently shared a story that happened to him just a few days ago. He was driving on the motorway when another driver in a BMW began racing through traffic and speeding. Tempted, my friend decided to catch up and ended up racing with him. While they were speeding along, they passed a parked police car. Moments later, flashing red and blue lights appeared behind him, he was pulled over, but the BMW driver kept going and escaped. My friend was caught driving at 170 km/h, which led to an instant three month license suspension and his car being impounded for the same duration. He now deeply regrets his actions, having learned a hard lesson about road safety and the real consequences of reckless driving—especially as he now has to face court.
WEEK 1
STYLES AND INSPIRATION FOR THIS STORY


My group decided to go with my mates story, so in this moodboard I looked into some driving POVs, and some potential camera angles from outside of the car that we could utilize in our work. I looked into these camera shots because our plan is to incorporate several CG shots of the cars racing on the road. Seeing that the racing shots we film will be completely digital, this opens up the oppotunirty to create shots that would be otherwise difficult to film in real life.
For the artistic style, we plan to pursue a rendered realistic look - blending real life elements with CG to create a final piece that feels as if it was filmed entirely in real life. We want to pursue this realism style as it will not only challenge us as VFX students to seamlessley composite CG and real footage, but allow the audience to feel more immersed in the visuals. The more realisitc we can make the visuals, the more real it will feel for the audience.
The bottom three images above, while completely computer generated, demonstrate the level of realism we aim to achieve, with real characters composited seamlessly into these scenes. Due to the nature of CG cars, they give off a "car game" aesthetic. Despite how realistic the cars look, a human eye can always catch wether it's CG or not. We could utilize this concept and turn our visuals into a car racing game which could expand our creative input towards this project but may take away from the realism we aim to achieve.
REALISM IN CAR GAMES
I decided to create a mood board based entirely on car game aesthetics after reflecting on my first mood board. Car games are the perfect source of inspiration for our style: realism. They aim to achieve the highest level of realism through CG cars and environments, which aligns directly with our project’s goal of creating realistic CG cars and environments. The more realistic our visuals become, the more immersed our audience will feel.


AI MOOD BOARD


Another small mood board. I created these AI images in Sora, where I focused on key shots such as the speedo, shifter, and the cars head to head on the highway. This AI mood board is to gain a sense of some shots that we could use for our project. I created a shot at night and day time to see what kind of themes you can feel based upon the time of day. Because this film is focused soley upon cars, we want to create a fast paced environment following along the themes of racing and speed, this will help immerse the viewers into the visuals as if they were in the drivers seat. The night time perfectly replicates this "racing and speed" concept as racers are generally seen at night time, hiding in the darkness. Therefore, we will look to set the visuals at night time or sundown. Based off the real story, he did get pulled over at sun down/night-time so we can pick and choose staying true to the story.
MOVIE AND FILM INSPIRATION
This mood board takes inspiration from professional movies based around cars. Films like these are a great source of inspiration because they contain hundreds of camera shots focused on cars that we can implement into our work. They also create strong themes of racing and speed, allowing us to study the sound techniques and camera shots used to reinforce a fast-paced environment. Some of the movies I looked into was fast and furious, grand turismo, need for speed and the animated movie, cars. These films are a great inspiration for the kind of mood and feeling we want to convey in our visuals. These movies are great at keeping you on the edge of your seat and engaged, which we want to reflect in our work to reimagine that racing feeling for the audience.



3D models
This week, we were meant to have finished the interview but unfortunatly I had not managed to get it done as my mate had been very busy for the past few days. So for now, I focused on finding some 3D assets that we could use for our visuals. The driver of the other car was racing a white BMW m2, so I had a look online to find this exact model. Fortunatly, I came across this red BMW M2, completely modeled interior and out, which worked perfectly for our case despite its colour. I also found some other cars that we could use for my friends car as I could not find a Mazda 3 MPS (his car) model online for free.
I took the BMW model into maya to have a look and do some testing. I changed the red colour to a glossy white, to match with the story line as the car that he was with was a "white" BMW. I then did some renders on the car to get a gauge at how realistic we could make this feel. The renders turned out great and will look even better with proper lighting, such as a dome light, and by being placed within a fully enclosed scene.

A few models I found online
Quick car render tests


STORY BOARD

I managed to interview my friend at the end of week 2, which was a little later then expected, but he had work and other activities to attend to. With the recording finished, I sent it to my group where we all agreed to come up with a story board based off the interview. At this point, we were a little behind the clock but despite this, had some good ideas in our pocket. My story board was more focused on getting my ideas down on paper rather then making it look all nice and clean. I listened along to the interview as I created my board, playing it back and forwath to cater for the timing of his speaking too.
In week 3 my group and I got together during our workshop to share our ideas with one and other. To my suprise, we all had some similar ideas in mind, which made merging the ideas a breeze. We got out the pen and paper and created a single story board which would soon be our final. Not only did we create a rough copy of the final story board but Andrew, a member from my group brought in 2 toy cars for us to help visualise our compositions and shots. We created another rough story board, but this time with the 2 toy cars and my phone camera so that we could gauge an understanding of layout.
Photo story board with toy cars --->

SHOT LIST


CREATING A SCENE/ENVIRONMENT
I had a look into multiple examples online of rendered motorways. My goal for this scene is to obtain that realism feel to reflect our artistic style. Looking online for motorway scenes, I noticed that alot of the so called "good scenes" were all blender files. Unfortunatly blender has their own material system, so if I were to export the blend file as an fbx and place it into maya, 9/10 times the materials will not show correctly as they are different to mayas material system.
I managed to find this street model that had a few lamp posts and a footpath. The problem with this model is that it resembles more of a casual road then a motorway. And because the setting for the story is on a motorway, I scrapped that model and went hunting again.
After a fair bit of time searching for a highway, I found another model that could work. This model was exactly what I needed but unfortunatly it was a blend file, so taking the model into maya, I had no textures to work with, just the model. Because this road was too good to pass down, I decided to texture it myself in substance painter.


NO HDRI

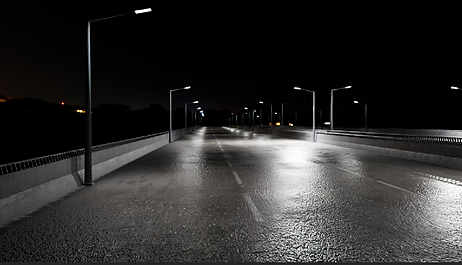
In order to make the road look as realistic as possible I utilised the layering function in substance. Dragging and dropping a concrete texture onto the road was not going to cut it. I added a few different layers. One was the base layer, the concrete texture. The second texture I added was this alternative concrete material. I adjusted its qualities such as the roughness to give it a reflective look, almost like water resting on the surface of the road. I then painted this material in random areas on the road. Lastly I dupliacted the concrete texture, darkened the tone and applied a scratchy/marked mask to enhance the roads diversity in contrast and to amplify its detail. I followed the same work-flow for the walls and lamp posts to make the scene feel as realistic as possible.

HDRI APPLIED
I exported the materials, then opened Maya and reapplied the materials to the scene objects. The textures looked amazing and the water effect turned out great. I added spotlights to the lamp posts so that the motorway was lit up and visible. The scene still felt empty. There was not enough light filling the scene. To solve this, I searched online for night time HDRIs. I found one that looked suitable. It had no harsh lights, black sky and distant elements like the mountains to fill the dark void. With the HDRI in place, the scene feels more lively and realistic which aligns with our artistic style. One thing did feel off which was the perspective of the HDRI. The mountains in the background felt somewhat close, making the motorway look smaller then it actually is. To solve this, I simply stretched out the HDRI to push back the mountains, forcing them further into the foreground.


Warped HDRI
FINAL SCENE



Already having done some testing with the white BMW it was prepared for the scene. Placing the car into the scene, it looked great, although further adjustments were needed to really blend the car into its surrounding environment. Firstly, I made the BMW slightly more metallic so that the surrounding street light would bounce off the car more intensly, thus, blending it into the scene better. Because the scene is set at night time, the headlights and tail lights of the car need to be on. To do this I simply selected the faces of the head and tail lights and applied a new white material to them. I then made the material emissive to give it that glowing effect.


BMW Gap scene
"The BMW driver darted dangerously between a truck and a car"


Again, the same process as the BMW but with this car model and the Toyota MR2 (Curtis's Car).
The MR2 model was made in blender, so I had the same issue as I did with the road textures where the materials would not show due to the difference in softwares. Again, I created my own materials for the car but this time within maya, utilising material properties such as metalness to give it that shiny look, replicating a real life car.
For this scene, it only lasts for a maximum of 5 seconds, so I had to keep that in mind when getting into the animation process.
I found a great truck model online that had plenty of detail which was perfect for this scene. I uploaded the truck fbx to a blank scene, so that I could apply the textures and maps to it before dropping it into the scene. That way, I have a clean file of just the truck that I can use when I need. I then followed the same steps with the BMW adjusting materials and lights.


With all the scene assets ready, I began to piece together the vehicles positions on the road. Following along with the animatic/storyboard- the original idea was to have the camera looking down from the truck and panning along with the car. This shot did look great in the view port, but I thought why not and try some different angles. Shots that may be more difficult to pull off in real life. After messing about with different ways this shot could be fimed, I found one that I thought looked good. There was no specific reason I chose this camera movement other then the way it was satasfying and seamless to watch. It also opened the oppotunity to add a camera shake as the BMW darts past the camera to help immerse the viewers into the scene.


PLAY BLAST OF SCENE BEFORE RENDERING

To make the scene feel more lively I duplicated the traffic car, changed its colour, and positioned it just infront of the truck. I also duplicated the truck and positioned it as an oncoming vehicle in the background. I then also added the MR2 in the very distance as the BMW races ahead. All these smaller elements liven up the road, reinforcing that realistic feeling.
Neck and Neck Scene
To achieve a sense of realism, I focused on camera movements that could possibly occur in a real-life car scene. Online, I noticed many car shots referred to as “rollers,” where someone sits in the back of a car with a handheld camera or gimbal, filming a car in front or behind. I wanted to replicate this “roller” style to give the shot a more organic, cinematic feel. While it could also be imagined as being filmed on a jib or arm, my goal was to simulate a camera movement that feels grounded in reality.
To further develop this realism, I added a car driving on the right hand side, inspired by the BMW gap scene. As the car passes, the camera subtly shakes and pushes away, enhancing the sense of intense motion.
Finally, I enabled motion blur when rendering the shot. This not only conveys the fast pace of the scene but also reinforces the feeling of a real, handheld camera capturing the action.


Traffic Light Scene

Creating a scene for the traffic light shot, I duplicated the road and overlapped it to create a cross section. Online, I found some traffic poles and applied a yellow material to replicate the ones in New Zealand. Lastly, I made a few touch-ups to the scene such as deleting some faces and objects from the road to open it up.


I then imported the two cars into the scene and positioned them at the traffic light. I also added in a truck and car to the right hand side to occupy the empty road.
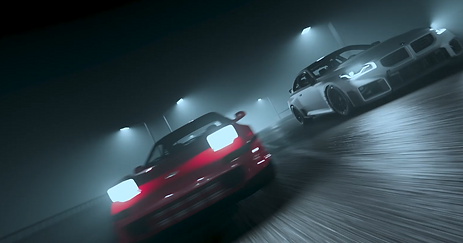
I wasn’t satisfied with how the initial render turned out, it felt too fake, which was the opposite of what I was aiming for. After researching online, I discovered a setting in Maya called aiAtmosphere, which creates a fog effect that can make a scene feel more immersive and realistic. I experimented with the various aiAtmosphere settings and discovered so many different moods, themes, and visual styles that could be conveyed just through the fog.
A key challenge was balancing the level of detail with the fog so that the CG elements would blend naturally with real-life footage. I decided on a darker, more muted atmosphere to match the shots we filmed, which were taken in near pitch black conditions, ensuring the final look felt consistent and realistic.
For this scene, I had to align the camera with the green screen footage of the drivers in their cars. Since the green screen footage was filmed statically, I needed to simulate a 2D camera within a 3D environment at the start of the shot, then transition the camera back into a 3D perspective as the cars take off.
To achieve this, I increased the camera’s focal length to 135mm at the beginning, making the shot appear as flat as possible for integrating the footage. I also lowered the BMW’s ride height to better align the two cars vertically, and pushed the BMW slightly back so the driver in the red car would stay easily visible
The shot on the left shows the original 2D side view, while the shot on the right demonstrates my attempt to recreate a flat 2D camera within a 3D environment. I was happy with the result.


To ensure the camera was perfectly aligned, I took screenshots from both the viewport and the raw footage of the two characters. I then brought these into Photoshop and positioned the characters in their seats as they would appear in the final shot. The alignment worked perfectly, and the red lighting used during filming worked great, enhancing the realism, simulating traffic lights in the scene.
One issue I noticed was how far forward I initially had to place Owen (in the further car). It looked unnatural, as if he had just been “dragged and dropped” into the seat. To fix this, I moved the red car slightly forward instead. This adjustment made Owen’s positioning feel more natural, with him sitting closer to the seat, achieving the realism I was aiming for.


Owen's original position

Owen's adjusted position
I then animated the car. As it slows down, I made the car jerk a little to simulate the suspension in the car as the car brakes. I also utilised the graph editor to make the decaleration more fluent and natural further emphasising that realistic look.
Animating the camera,
I tried to drop in the audio file into the maya timeline to help align the speaking with whats happening in the scene but unfortunatly it did not want to work. This would have been a huge helping hand with timing where the camera needs to be, but I just had to stick to the keyframes as a refrence for timing.
I dropped in a screenshot of the BMW driver, parented him to the BMW and positioned him in the seat for the shot. This helped me to get a gauge for the camera movements. Because I am working with static footage and a camera that transitions into 3D, I need to be careful that the audience will not notice that the drivers are static footage. The camera needs to pan off the screen enough before it can begin rotating otherwise the footage may be noticed as a flat plane.
As the BMW driver enters into frame and comes to a stop, there is no motion in his body that simulates the stop, he moves exactly with the car which makes the shot feel highly unrealistic and faked. To solve this, it was something we had to think about during our filming in the green screen room and fortunatly for us, we did. We had a single take with Andrew (the BMW driver), where as he comes to a "stop" we made him jerk forward a little to mimic him slowing down in the car. During our filming, we had to think about all these little details that help bring shots like this to reality. For example, the subtle red light reflecting off the visor of Andrew, this was done in order to simulate the red traffic lights that the two cars are waiting at.

I decided that it would be a smart idea to take the video of Andrew where he jerks forward, do a rough key in davinci then import the video sequence into maya. In doing this, allowed me to simulate and more accuratly align the driver and the car together.


To figure out how to mask the characters behind the cars, I learnt about a cryptomatte. When I renderd out my scene in maya, I also rendered a crpytomatte_object AOV. This means I can select objects and put my charcters behind them. The issue I had here was the cars were made up of so many different objects that It would take alot longer to render, and a painful process to select all the parts when compositing in nuke. I came up with a solution where I selected hald of each car and grouped those faces together. So i was left with a car object 1 and car object 2, for both cars, where the characters go inbetween the objects.
To figure out how to mask the characters behind the cars, I learned about Cryptomatte. When rendering my scene in Maya, I also rendered a cryptomatte_object AOV, which allows you to select objects and place characters behind them.
The challenge was that the cars were made up of many separate objects, making it time consuming to select all parts individually during compositing in Nuke. To solve this, I grouped half of each car’s faces together, creating Car Object 1 and Car Object 2 for both vehicles. This way, the characters could be placed between the two objects, simplifying the compositing process.


After rendering, I discovered that the truck’s materials were not showing up in the render and rather, it appeared white. While the materials were applied, they weren’t rendering correctly. I didn’t want to rerender the entire scene, as it would take too long, so I needed a way to render just the truck. It was too noticable to just leave so I had to do something about it.
To solve this, I applied an aiMatte to everything in the scene except the truck and rendered only the frames where the truck was visible. I then composited the truck back into the main render. While this approach sounds straightforward, it took me some time to figure out, since I had never done it before, but it ultimately allowed me to fix the issue without rerendering the entire scene thankfully.


When bringing the scenes into Nuke, they looked great, but the Cryptomatte AOV wasn’t showing. I discovered this was because Cryptomattes cannot be rendered with Arnold GPU, and I had initially used the GPU to render my scenes. To fix this, I switched to CPU and rendered the cryptomatte_object again. To speed up the process, I applied an aiFlat material to everything in the scene, which prevents Arnold from rendering shadows and other unnecessary elements. I also disabled aiAtmosphere and all lighting to make the render faster. After testing the Cryptomatte in the Arnold Render View, it worked perfectly. It clearly shows how I split both cars into two separate objects, allowing me to layer the characters between the car sections. While there may have been a more convenient method, this did the job just fine.
Re-rendering the scene with aimatte materials

As for the drivers positioning and tracking. I created two planes and positioned them in the driver seats of both cars. These are the cards that I will drop the driver exr sequences onto.


In Nuke, I imported both renders, one of the entire scene and one of the truck alone. I merged them and adjusted the merge settings to get the render looking right, making sure both EXR sequences were properly aligned.
I then imported the two planes and the camera exported from Maya, created a Scene node, and connected everything together. After checking, I confirmed that everything was working as it should so far...

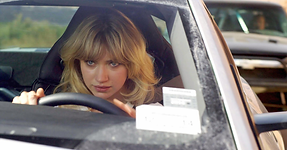
The next stage was to key out the two drivers in Nuke. I imported both driver EXR sequences and started with the BMW driver first. During the green screen shoot, we filmed in low lighting to match the nighttime scene, which made the keying process a bit more challenging than usual, but still manageable.


I noticed a few small spots on the green screen that showed in the final key. To fix this, I applied a roto node and used the stamp tool to remove those small spots.


keying was difficult. I could have taken the easy way out and done it in after effects but I was eager to learn in nuke. I spent alot of time figuring out different nodes and their functions. I really struggled getting my head around so many different nodes and so many different settings for each of the nodes, but despite this I still managed to get away with a rough key. Its not my best work but I was satasfiyed with what I needed it for. I think I overwhelmed myself with the keying by watching so many different videos on youtube. Despite having all the same principles, everyone has their own method of keying and I watched both beginner videos and more complicated videos which made me more puzzled at what nodes I should use for my situation.
With the keyed out characters on the cards. They were warped. They warp with the motion of the camera. This was caused because the camera/camera transform isn’t correctly matched to the card. To fix this I instered a project3D node and connected it to the camera, card, and lastly the keyed out drivers. This fixed my issue.


Project 3D node
Scene setup
Once the Project3D setup was in place, I noticed that the drivers no longer moved along with the animation of the cars. After some troubleshooting, I discovered that the Project3D node in Nuke doesn’t support animated geometry, which explained why the drivers appeared static. Since the animation did not work with the Project3D node, I removed the node, and had to manually adjust their placement. To fix this, I scaled the drivers along the Y-axis until they matched with their original shape as well as the placement within the car.
The Cryptomatte pass initially had no transparency in the window areas of the car, which made them unusable for proper compositing. This issue caused problems when trying to layer the drivers behind the glass, as the matte treated the windows as solid surfaces instead of transparent ones. I assumed that because the material was transparent it would render out as a half-transparent cryptomatte object, unfortunatly this was not the case. Generally, this should work, but I think it hadn't this time because I merged the car body mesh together or had the wrong settings, still unsure. To fix this, I removed the window faces from the body of the car and let the cryptomatte render again over night, ready for tommorow.

With the new Cryptomattes rendered, I imported them into Nuke, and this time they worked correctly. However, I noticed that the characters were clipping inside the Crypto objects instead of appearing behind them. I realized the matte needed to be inverted although watching some tutorials online, they did not do this step. Applying an Invert node solved the issue. A simple fix that took a bit of time to figure out.
Once the mattes were working properly, I scaled and positioned the characters inside the driver seats of their respective cars. I also added a TimeOffset node to align the character sequences with the car animations, ensuring everything moved together in harmony.

Another issue I encountered was the characters becoming visible through the cars toward the end of the shot. To fix this, I added a Switch node connected to a Constant with an alpha channel. This allowed me to control when the characters were visible in the scene, and once they were no longer needed, the Switch node transitioned to the Constant, hiding the driver.
My final issue was yet another Cryptomatte problem. The pole I added to the Cryptomatte so the character would appear behind it ended up being linked to other poles in the background, both the foreground and background poles were grouped as a single object. This happened because of how I set the scene up in Maya. As a result, some of the background poles intersected with the driver’s helmet, creating a noticeable visual error. Even though it was a small issue, it needed to be fixed since the audience’s attention is naturally drawn to the drivers, making any mistake in that area highly visible.
To resolve this, I removed the the poles as a crypto object and I created a Roto node and keyframed a mask around the foreground pole. I then connected the mask to the driver node tree so the pole would correctly appear in front of them, fixing my issue.


Here you can see the grey poles in the helmet of the driver

Roto masking the pole over the sequence
To finish off this shot, I had to colour grade the two characters to blend in with the scene. I first balanced out the black and whites to match the scenes maximum and minimum black and white tones. I then increased the blue and green values under the gain tab in the grade node to match the rest of the scene.
I came across more issues then I was expecting with grading. Firstly, as the headlight of the BMW comes across the red car, the red car illuminates, but not the driver. This caused the driver to misalign with the rest of the scene, making it stand out, thus, looking unrealisitc. I came up with a solution. I created a grade node on the driver and utilised the gain slider to increase the brightness of the driver as the headlight approaches, then decrease as the headlight passes. This worked suprisingly well and I was super happy with the result.
driver stands out when white light goes past (with the grading already done)


The colours also change in the shot, from a greeny hue to a more redish tone so the original grade for the beginning of the scene doesn''t align with the end of the scene as shown below. To solve this I again utilised the keying fucntion to key the gain channels decreasing the blur and green values and increasing the red as the red light approaches the driver.
These two snapshots of the driver with the same grade. It showcases how the environment significantly changes in terms of lighting. The first snapshot works well where as the second, not so much.
I took up the role in piecing everyones shots together. I also did the sound editing in premier pro using free online sounds from pixabay.

Lastly, I made a title card for the screening night, Andrew came up with the name Brake point.

Reflection
Overall, I’m really proud that we managed to bring our idea to life. What started as a few notes on paper and photos of toy cars to visualize different scenes eventually evolved into a complete, polished final project. I’m genuinely happy with the effort and dedication both my group and I put into making this project into reality.
Throughout the process, I’d say the area I improved on the most was compositing. I was introduced to a wide range of nodes in Nuke that I had never used before, and it really expanded my understanding of what’s possible in visual effects, and m just at the beginning. I also learned just how crucial lighting is, both in CG and live action footage. It plays a huge role in creating immersion and helping the CG elements blend naturally with the real world components.
Following our artistic style of realism, I believe we pushed the realism as far as we could within our timeframe and current skill level. The attention to smaller details such as lighting, camera angles, and animation techniques all contributed to the believable, cinematic look of a real car scene. Having such a strong style for our project helped push the creative aspect, I had to think about all the smaller details and things I would have never even thought about noramlly.
If I were to do this project again, I’d love to attempt more complex compositing shots, such as integrating 3D greenscreen footage into fully CG environments, and experimenting further with camera tracking and other advanced techniques. One of my favorite parts of this project was the creative proccess, taking an idea from imagination to a fully rendered shot was incredibly rewarding.